Food waste piles up fast. Most of it ends up in landfills, sealed off from air, where it rots and releases methane—a greenhouse gas far more damaging than carbon dioxide. Yard clippings, vegetable peels, coffee grounds—it’s all thrown away when it could be feeding the soil instead.
Some systems sit in the backyard; others fit neatly indoors. Done correctly, composting cuts down on household waste and gives something back to the soil. This guide explains the process, outlines your options, and helps you avoid common mistakes as you get started.
Table of Contents
What Is Composting?
Composting is a controlled way of breaking down organic matter. Microbes—mainly bacteria and fungi—do most of the work. They digest food scraps, leaves, grass clippings, and other plant-based waste. What starts as trash turns into rich, dark, crumbly compost.
The process relies on four elements: carbon, nitrogen, moisture, and air. Dry materials like leaves supply carbon. Fresh waste, such as fruit peels or coffee grounds, supplies nitrogen. Add water to keep things damp, turn the pile to let in air—and over time, the material breaks down.
Benefits of Home Composting
Home composting offers clear and long-lasting advantages—both for the environment and for the soil under your feet.
Food waste, when buried in landfills, breaks down without oxygen and releases methane. That gas contributes to climate problems more severely than carbon dioxide. Composting interrupts that cycle.
There are also everyday benefits, especially for those who grow plants, herbs, or vegetables:
- Improves soil structure — Compost helps soil retain moisture without turning heavy or compacted.
- Increases microbial activity — Healthy microbes in compost support root development and break down nutrients into forms plants can absorb.
- Reduces the need for synthetic fertilizers — Over time, nutrient-rich compost can replace or reduce store-bought additives.
- Softens poor soils — Sandy or clay-heavy soils gain texture and stability when mixed with compost.
- Regulates water — Compost absorbs water and releases it slowly, helping prevent both drought stress and runoff.
It also reshapes how waste is viewed. Scraps and clippings become inputs. That shift can make a noticeable difference in how much trash a household produces.
Composting in Your Backyard
Creating a backyard garden and composting in it, is one of the simplest ways to turn kitchen and yard waste into something useful. It doesn’t require a large property or expensive gear, but placement and system design do matter. A little forethought helps the process run more smoothly—and keeps pests, odors, and soggy piles from becoming problems later.
Pick your spot carefully. Choose a location with some shade, good air circulation, and drainage. Keep it within reach of a hose or watering can. Avoid placing spots directly against your house or in low-lying areas where water accumulates after rain.
Common backyard composting setups include:
- Open piles
This is the most basic method: just a heap of organic material layered directly on the ground. It works well if you have space and aren’t concerned about its appearance. Turning is done with a shovel or fork. However, because it’s exposed, it may attract animals or dry out in hot weather. Covering it loosely with a tarp helps hold in moisture and warmth.
- Compost bins
These come in various shapes—cylinders, cubes, stacked tiers—and can be built from wood, wire, or plastic. A bin helps contain the material, making it neater and more efficient at holding heat.
Many store-bought bins have lids and bottom doors, making it easier to add fresh material and harvest finished compost without disturbing the whole pile.
- Tumblers
Tumblers are sealed containers mounted on a frame, allowing them to be turned by hand. This design limits animal access, retains moisture, and helps with faster decomposition due to improved aeration.
Most are smaller in volume, which works well for smaller households or anyone with limited backyard space. The sealed structure can also speed up composting during warm months—some batches finish in six to eight weeks.
Regardless of which type you choose, the key principles stay the same: balance green and brown inputs, maintain moisture, and allow for airflow. A well-managed pile—turned regularly and kept at the optimal moisture level—can break down efficiently without emitting odors or attracting pests.
Some gardeners set up two bins or piles: one for active additions, another left to rest and finish. This rotation makes it easier to collect compost without digging through fresh scraps.
Choosing the Right Composting Method
No single composting method suits everyone. The best system depends on your available space, how much time you’re willing to commit, and the type of material you plan to compost. Some methods require regular turning and close attention to detail. Others are slower but need little effort once set up.
Below are three of the most common methods used in home composting, each with its own practical considerations:
Traditional Compost Piles
These are simple, open piles built directly on the ground. Materials are added in layers—alternating wet (green) and dry (brown) matter—and turned regularly to introduce oxygen.
Pros:
- Low-cost and flexible in size
- Can handle large amounts of material
- Good for those with plenty of yard waste
Things to consider:
- Needs regular turning (every 1–2 weeks) to stay aerobic
- It may take 3–6 months to produce finished compost
- Wildlife and neighborhood regulations might require containment
This method works best when the pile reaches a critical mass—at least 3×3×3 feet—to retain enough heat for microbial activity. In hot composting systems, internal temperatures can reach 130–160°F (55–70°C), which speeds up decomposition and kills many seeds and pathogens.
Compost Bins and Tumblers
Bins are enclosed structures that hold compost in a more contained way. Tumblers are a variation with a rotating barrel, making it easier to mix materials.
Pros:
- Neater appearance; more contained
- Easier to manage in small yards
- Reduces the chance of pests or odor
Things to consider:
- Commercial bins may be more expensive than DIY setups
- Tumblers usually hold less material than open piles
- Compost can dry out faster in hot climates—monitor moisture
Bins and tumblers suit people who want faster results with less hands-on turning. Some insulated models can even be used through the winter in mild climates. For most households, weekly rotation or mixing is enough to keep the breakdown moving steadily.
Vermicomposting (Using Worms)
This method uses red wiggler worms (Eisenia fetida) to break down food waste. It’s often done indoors or in a sheltered area, using a container layered with bedding (like shredded paper or coconut coir) and kitchen scraps.
Pros:
- Compact and suitable for small spaces, including apartments
- No turning required—worms do the mixing
- Produces castings, a highly concentrated soil amendment
Things to consider:
- Requires temperature regulation—worms die in freezing or very hot conditions
- Can’t handle yard waste or large volumes at once
- Sensitive to certain food types (e.g., citrus, onions, spicy scraps)
A typical worm bin can process about half a pound of food per day per pound of worms. With the right setup, vermicomposting is nearly odorless and low maintenance. Castings can be used directly in garden beds or pots or blended into seed-starting mixes.
Factors to Consider When Selecting a Method
Available space
- Open piles and large bins need a substantial outdoor footprint.
- Tumblers fit tighter yards.
- Vermicomposting works indoors or on balconies.
Time commitment
- Hot compost piles break down fast but need turning and monitoring.
- Bins and tumblers require moderate upkeep.
- Worm systems need occasional feeding and moisture checks but little else.
Climate conditions
- Outdoor systems slow down in cold weather.
- Tumblers and bins can retain some heat, especially if insulated.
- Worms need stable indoor conditions between 55–80°F (13–27°C) and can’t survive frost.
Setting Up Your Composting System
Once you’ve chosen a method that suits your space and lifestyle, the next step is setting up the system correctly. A well-prepared composting setup is easier to maintain and gives better results over time.
Start by gathering the right materials and planning for where the compost will go. Most systems can be assembled in a day or less. After that, regular input and occasional upkeep will keep things moving.
What Can and Cannot Be Composted
Understanding what goes into your compost—and what stays out—is essential. Some items feed the decomposition process, while others slow it down or cause problems.
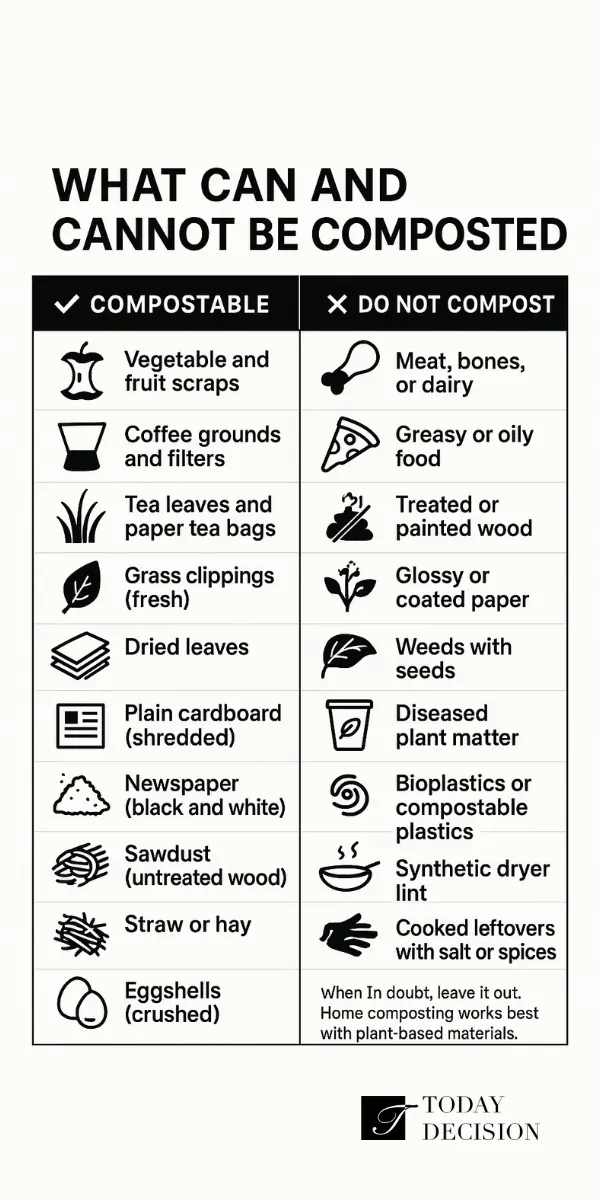
Compostable Materials
Most organic matter falls into two categories: greens and browns. Getting the balance right between them supports microbial activity and helps avoid odors.
Greens (nitrogen-rich):
- Vegetable and fruit scraps
- Coffee grounds and paper filters
- Tea leaves and bags (unbleached, plastic-free)
- Fresh grass clippings
- Garden trimmings (soft, green material)
- Manure from plant-eating animals (e.g., rabbits, chickens)
Browns (carbon-rich):
- Dried leaves
- Straw or hay
- Shredded newspaper or plain cardboard
- Sawdust (from untreated wood)
- Cornstalks or dried plant stems
- Paper towels and napkins (if uncoated and food-free)
Aim for roughly three parts brown to one part green by volume. That keeps moisture levels in check and prevents the pile from becoming slimy or compacted.
Items to Avoid
Some materials can introduce pathogens, attract pests, or slow decomposition. Others simply don’t break down properly in a home system.
- Meat, bones, or dairy products
- Fats, oils, or greasy food scraps
- Cooked food (especially with salt, oil, or seasoning)
- Pet waste (cats, dogs)
- Diseased plants or invasive weeds with seeds
- Glossy or coated paper
- Treated or painted wood
- Bioplastics or compostable plastics (most don’t break down in backyard systems)
- Dryer lint (especially from synthetic fabrics)
Adding these can lead to odor, maggots, rodents, or an unbalanced pile that breaks down unevenly.
Tips for Maintaining a Balanced Compost Mix
- Chop large pieces — Smaller items break down faster and don’t form clumps.
- Keep it damp but not soaked — A good benchmark: it should feel like a wrung-out sponge.
- Alternate layers — Don’t dump all greens or browns in one go. Mixing helps microbes stay active.
- Add in batches — Wait to add a new layer until you have enough browns to balance out a batch of kitchen scraps.
- Monitor odor and appearance — A healthy pile has an earthy smell. Sharp or sour smells mean something’s off (too wet, too much green, or not enough air).
Setting things up with these basics in mind prevents most early-stage composting issues.
Maintaining Your Compost Pile
Once your pile or bin is set up, attention shifts to maintaining balance. Compost isn’t passive—it benefits from a bit of care.
- Airflow
Oxygen fuels the microbes doing the decomposition. A pile that isn’t turned will eventually slow or shift anaerobic. For open piles, turn with a fork. Tumblers just need a few rotations. If your system is static, add coarse material like straw or shredded stems to create natural pockets of air.
- Moisture
Too dry, and the pile stalls. Too wet, and it smells. Test it by hand: if a squeezed handful drips, it’s too wet. If it crumbles apart, it needs water. Add dry browns to soak up excess moisture or sprinkle water over dry patches.
- Heat
You don’t need a thermometer, but it helps. A well-balanced pile should feel warm to the touch at the center during its most active phase. If it cools prematurely, add more greens or turn it to reintroduce oxygen.
- Feeding in layers
A common gardening mistake. Avoid dumping all your kitchen scraps in one spot. Spread them, then cover with a layer of browns. This discourages flies and keeps smells in check.
- Let it rest
After the pile stops heating up and the texture turns fine and dark, let it sit undisturbed for a few weeks. That “curing” stage helps stabilize nutrients and makes compost gentler on plants.
When Is Compost Ready to Use?
You’ll know your compost is ready when there’s no sign of the original ingredients. According to the University of Florida, the result should be fine-textured, loose, and dark brown. The smell? Earthy and neutral.
Look for these signs:
- The pile is no longer heating.
- You can’t pick out food scraps or leaves anymore.
- The texture feels like soil, not mulch or clumps of half-rotted matter.
- It smells like a forest floor—mild and clean.
Letting it sit a few weeks after it looks finished will reduce the chance of it being too rich or too active for young plants.
Common Composting at Home Issues
Even a well-managed compost system can run into a few snags. Here’s what to watch for—and how to respond:
- Strong odor
Sour or ammonia-like smells suggest too much nitrogen or too little air. Add shredded leaves or cardboard and turn the pile.
- Pile stays cold
A small or dry pile can struggle to heat up. Increase the volume, mix in more greens, and moisten the entire pile evenly.
- Pests
Rats and raccoons don’t visit for banana peels—they come for meat, grease, or dairy. Don’t add those. Keep a lid on bins if you’ve had issues before.
- Fruit flies
These are often attracted by uncovered food. Bury scraps in the center of the pile or cover with a thick brown layer.
- Too wet or soggy
Rain, juicy scraps, or too many greens can make a pile slimy. Add dry, absorbent material like straw or shredded paper.
- Worm bin problems
In vermicomposting, if worms crawl away or die, the bin might be too hot, too wet, too acidic, or lacking ventilation. Remove excess moisture, lift the bedding, and hold off on citrus or onions.
FAQ
How often should compost be turned?
Once every 1–2 weeks for hot piles. Tumblers work with less effort—just rotate every few days. Cold piles can sit longer between turns.
Can cooked food go in the compost?
It’s best not to. Oils, salt, and meat residues make conditions harder to control and invite pests.
What about weeds or weed seeds?
Only if your pile gets hot enough to kill them—at least 130°F for several days. Otherwise, they may survive and sprout later.
Do I need a special bin?
No. A simple heap works fine. That said, bins help retain heat and look tidier in small spaces.
Is it safe to compost moldy food?
Yes—most molds are part of natural decay. Just avoid anything rotten with a strong odor or signs of contamination.
Can I compost eggshells?
Yes, though they break down slowly. Crushing them speeds the process. They also add calcium.
How much compost should I apply to a garden bed?
A 1–2 inch layer on top or mixed into the top few inches of soil works for most beds.
This content is generated by AI, reviewed by our editorial team, and features products that have been thoroughly evaluated and chosen.