Growing a vegetable garden at home doesn’t require ample space—just planning and consistency. This guide walks you through how to start a vegetable garden in your backyard step by step, including how to prepare the soil, choose a layout, pick crops, and manage watering and seasonal care.
Table of Contents
Planning Your Garden: Type, Size & Layout
Start by thinking about how much time and space you can commit. A smaller plot is easier to maintain and still gives good results. Sketch a rough plan of your garden beds, keeping pathways and plant spacing in mind. Use grid paper or simple digital tools if needed.
Organize plants by height and growth habits to avoid shading minor crops. If you’re starting out and wondering how to start a garden in your backyard, focus on clear structure over size.
Raised Beds vs In-Ground vs Containers
Each method has pros and trade-offs. Raised beds allow better control over soil quality and tend to drain well. They suit areas with poor native soil and are easier on the back. In-ground beds cost less but may require more weeding and initial soil work.
Containers are portable and fit patios or small yards, though they dry out faster. Choose what fits your space, time, and what you plan to grow.
Garden Size Recommendations
Beginners do well with 100 to 200 square feet. That’s enough space for several types of vegetables without being overwhelming. If that feels like too much, even one 4×4 or 4×8 raised bed can be enough to start. A few things to remember:
- Don’t overcrowd—plants need space to grow.
- Start with fewer crops and get to know them.
- Expand later, after a season or two of hands-on learning.
Design Ideas & Layout Tips
Place taller crops on the north or west side so they don’t block the sun from smaller ones. Leave walking paths between rows or beds to avoid stepping on growing areas. Keep leafy greens and herbs closer to the edge for easier harvesting. To simplify watering, plant crops with similar needs together. Raised beds, square-foot grids, or even rows all work—keep the plan easy to follow and consistent.
Choosing the Best Location
Pick a site that gets steady sun, drains well, and has nearby access to water. Watch how the light hits your yard throughout the day. Avoid low areas that stay soggy, or spots crowded by tree roots. You’ll also want it close enough to your home that you can check on it without much effort. Location is one of the biggest factors in long-term garden success.
Sunlight Requirements
Most vegetables need at least 6 hours of direct sunlight. Fruiting plants like tomatoes and peppers prefer a temperature closer to 8. Leafy crops like lettuce and spinach can handle less. Pay attention to shadows from fences, sheds, or tall plants. If you’re unsure, check light levels throughout the day before deciding where to place your beds or containers.
Water Access & Drainage
You’ll need a hose hookup or a nearby spigot. Carrying water far becomes a hassle fast, especially in hot weather. Also, check how your site handles rainfall. If water pools or drains slowly, you’ll need raised beds or grading. The ground should stay moist—but not soggy—after watering or rain. If drainage is poor, even healthy plants can suffer.
Climate Zone Considerations
Use your planting zone to time crops accurately. The USDA hardiness map or local extension offices can help. Timing matters—cold-hardy crops go in early or late, while warm-weather vegetables need to wait until after frost. A simple search for your zone and average frost dates helps you avoid planting too early or too late.
Preparing Your Soil
Soil sets the stage for the entire season. Remove grass, weeds, and rocks. Dig down or build up, depending on your method. Add compost, aged manure, or both to improve texture and feed your plants. Sandy soil drains quickly and needs organic matter. Heavy clay holds water and needs loosening. Take your time with this part—it pays off later.
Site Clearing & Sheet Mulching
You can dig up sod with a spade or use a sod cutter for large areas. Another option is sheet mulching—layer cardboard over the area, then add compost and mulch. It kills grass without digging and improves the soil as it breaks down. This method takes a few weeks, but it works well if you’re not in a rush to plant.
Testing & Amending Soil
Basic test kits are cheap and easy to use. Check pH and nutrient levels before planting. Most vegetables do best in soil with a pH between 6.0 and 7.0. If the pH is off, you can adjust it with lime or sulfur. Mix compost deep into the top 6–12 inches of soil to improve structure. Let any added fertilizers sit for a few days before planting.
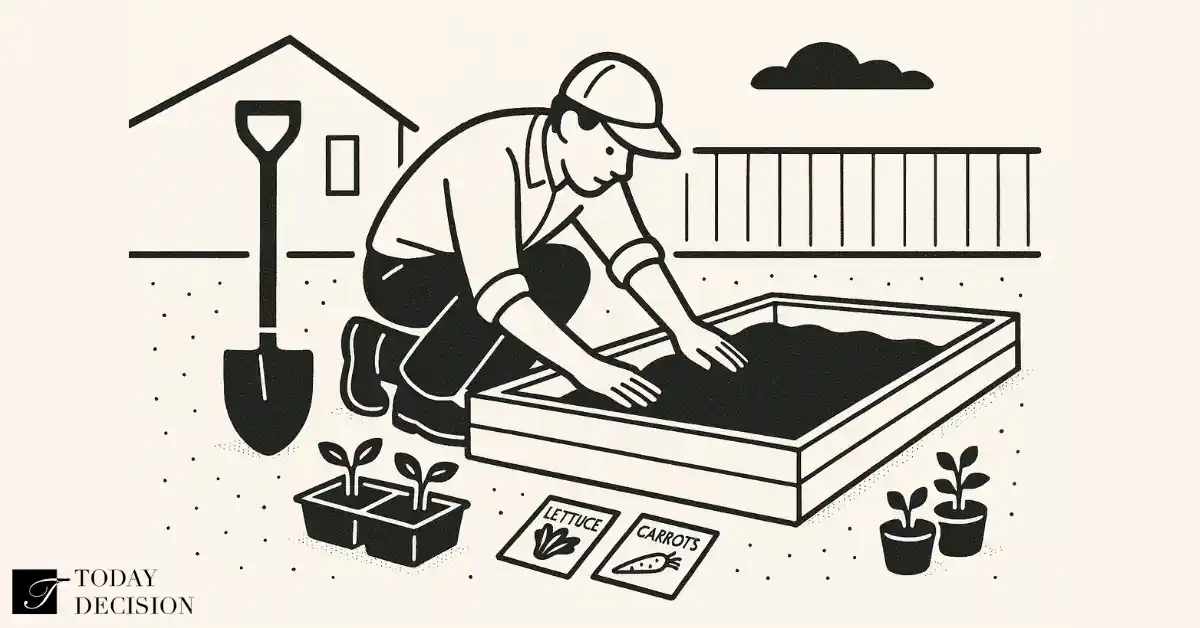
Building Raised Beds
Build frames 6 to 12 inches deep using untreated wood or other sturdy materials. Keep beds narrow enough—4 feet wide or less—so you can reach without stepping in. Fill with a mix of compost, topsoil, and other organic materials like leaf mold. Raised beds warm faster in spring and drain better than native soil, making them useful in many yards.
What to Grow: Family Favorites & Easy Vegetables
Choose vegetables you already like to eat. Stick to a few types that match your season and soil. New gardeners do better with quick-growing crops and those that don’t need constant attention. Local nurseries often carry varieties suited to your zone. Keep your first list short so you can track each crop’s needs and spot any problems early.
Vegetables Beginners Love
Start with crops that grow fast, take up little space, and don’t need much babysitting:
- Leafy greens: lettuce, kale, arugula
- Root vegetables: radishes, carrots, beets
- Bush beans and snap peas
- Zucchini or cucumbers (if you have room)
- Cherry tomatoes (choose disease-resistant varieties)
These give good returns without a steep learning curve.
Companion & Succession Planting
Certain plants do well together. Basil can help tomatoes. Marigolds deter some soil pests. Companion planting is a way to use space and plant relationships to your advantage.
Succession planting means starting new crops as old ones finish after harvesting spring radishes, and planting bush beans in the same spot. This keeps beds producing without gaps in the season.
Planting Seeds vs Seedlings
Seeds cost less and give you more variety. They’re best for crops that sprout quickly—like lettuce, peas, and beans. Seedlings work better for slow growers like tomatoes, peppers, or eggplants. You can start your own indoors or buy them from a garden center.
For your first season, using a mix of both usually works best. It saves time and gives you a head start without needing to grow everything from scratch.
Indoor Seed Starting
Starting seeds indoors gives crops a head start before the outdoor season begins. Use seed trays or small pots, placed in a bright window or under grow lights. Maintain consistent moisture and temperature—most seeds germinate well between 65°F and 75°F.
Harden off seedlings gradually by placing them outside for a few hours a day before transplanting. This reduces transplant shock and helps them adjust to sun, wind, and outdoor conditions.
Direct Sowing Techniques
Some vegetables grow better when planted directly into garden soil. This includes carrots, radishes, beans, peas, and corn. Follow the spacing and depth instructions on the seed packet. Water gently after planting and keep the soil moist until seeds sprout.
Use row markers to avoid disturbing spots where seeds are still germinating. Thin seedlings early so the remaining plants have enough room to mature properly.
Planting Schedule
Timing is based on your frost dates and the type of vegetable. Cool-season crops like spinach and peas can go in a few weeks before the last frost. Warm-season vegetables—such as tomatoes, cucumbers, and peppers—should wait until after the last frost has passed.
Use a calendar or planting guide based on your zone. Spread out planting over several weeks to avoid having everything ready to harvest all at once.
Garden Layout Methods
Choosing a layout affects how much you can grow in the space you have. It also affects watering, airflow, and harvest access. Keep the layout clear and easy to maintain. Beds should be reachable from all sides without stepping into them. Rows, grids, or vertical structures each offer different advantages depending on your space and crop choices.
Square-Foot Gardening
This method divides beds into 1-foot squares, each planted with a set number of seeds or plants. It works well for small gardens and helps control spacing and crop rotation.
For example, one square might hold one tomato plant, four lettuce plants, or nine onions. This system keeps the garden organized, reduces weeding, and makes it easier to plan and replant throughout the season.
Vertical Gardening & Trellising
Using vertical space lets you grow more in small areas. Climbing crops like beans, cucumbers, and some squash types do well with trellises. Use strong supports like metal mesh, wooden frames, or twine stretched between posts.
Vining plants grow up rather than out, which keeps them off the ground and reduces rot or pest problems. It’s also easier to spot and pick fruit at eye level.
Watering, Feeding, & Mulching
Consistent moisture and soil nutrients are key to strong growth. Plan a watering schedule based on your soil type, weather, and plant needs. Use mulch to reduce evaporation and help regulate temperature. Fertilizers and compost feed the soil, not just the plants. Together, these practices support steady growth throughout the season.
Irrigation Setup & Schedule
Drip irrigation or soaker hoses deliver water directly to the roots, where it’s needed most. They save time and reduce waste. Water early in the day to limit evaporation and help prevent fungal diseases.
Avoid overhead watering if possible—it can lead to leaf problems. Check soil moisture regularly; if the top inch is dry, it’s time to water. During hot spells, frequency may need to increase.
Organic Fertilizers & Composting
Use compost and slow-release organic fertilizers to support plant health over time. Compost adds nutrients and improves soil texture. Balanced fertilizers with nitrogen, phosphorus, and potassium can help if soil tests show deficiencies.
Avoid overfeeding—too much fertilizer can damage roots or promote excessive leaf growth at the expense of fruit. Homemade compost from kitchen scraps and yard waste works well once broken down.
Mulch Types & Benefits
Mulch keeps soil moist, suppresses weeds, and buffers temperature swings. Use straw, shredded leaves, grass clippings (in thin layers), or bark mulch. Apply it after seedlings are a few inches tall or after transplanting. Keep mulch a few inches away from plant stems to prevent rot. Organic mulch breaks down slowly and adds nutrients to the soil over time.
Ongoing Care: Maintenance & Pest Control
Routine upkeep helps your garden stay healthy and productive. Monitor for signs of disease, overcrowding, or nutrient problems. Regular weeding, pruning, and adjusting for weather shifts keep plants in better condition. Natural pest control methods reduce damage without harming pollinators or soil life. Stay on top of small problems before they spread.
Weeding, Pruning & Thinning
Remove weeds before they compete with your crops for nutrients and water. Thinning is also important—too many seedlings in one spot will crowd each other. Use clean tools to snip extra plants at the soil line rather than pulling them up. Prune damaged or crowded growth to improve airflow, especially on vining or bushy plants. Regular upkeep gives each plant a better shot at producing well.
Natural Pest Strategies
Insect pests can be managed without chemicals. Use row covers to block common insects like cabbage moths or squash bugs. Attract helpful insects like ladybugs and lacewings by planting flowers such as dill, alyssum, or yarrow. Pick off larger pests like hornworms by hand. For small infestations, insecticidal soap or neem oil can be used sparingly. Rotate crops yearly to avoid pest buildup in the soil.
Monitoring & Seasonal Adjustments
A common gardening mistake is overlooking this. Check plants at least every few days—look under leaves, feel the soil, and note changes. Adjust watering during heat waves or rainy periods. In late summer, begin planning for fall crops or cover crops to improve soil.
In colder climates, consider row covers or cold frames to extend the season. Responding to conditions as they change makes a noticeable difference in how well your garden holds up.
Harvest, Storage & Moving On
Timing harvests correctly helps you get the best flavor and texture. Don’t wait too long—overripe vegetables can become tough, bitter, or spoiled. Store produce based on type: some need refrigeration, others do better in cool, dry storage.
Once crops are cleared, plan for the next planting or rest the bed with mulch or a soil-building cover.
Harvest Timing by Crop
Each crop has its peak window. Leafy greens are best picked young, while tomatoes should be firm and fully colored. Root vegetables like carrots and beets can stay in the ground longer, but not too long, or they’ll become woody.
Use clean tools when cutting or pulling vegetables. Check daily during peak season—missed harvests can attract pests or cause the plant to shut down early.
Storing & Preserving Produce
Different vegetables need different storage conditions. Store greens in a fridge crisper with a damp cloth. Keep potatoes, onions, and garlic in a dark, dry, well-ventilated space. Tomatoes taste better when stored at room temperature.
For long-term storage, options include freezing, canning, drying, or fermenting. Process surplus quickly—freshness declines fast after harvest.
Crop Rotation Strategies
Rotating plant families from one bed to another each year helps reduce soil-borne pests and diseases. It also balances soil nutrient use. For example, follow heavy feeders like tomatoes with legumes, which fix nitrogen.
Keep a notebook or simple map of past seasons to track what grew where. Three- or four-year rotation cycles are generally effective.
Season-by-Season Checklist & Troubleshooting
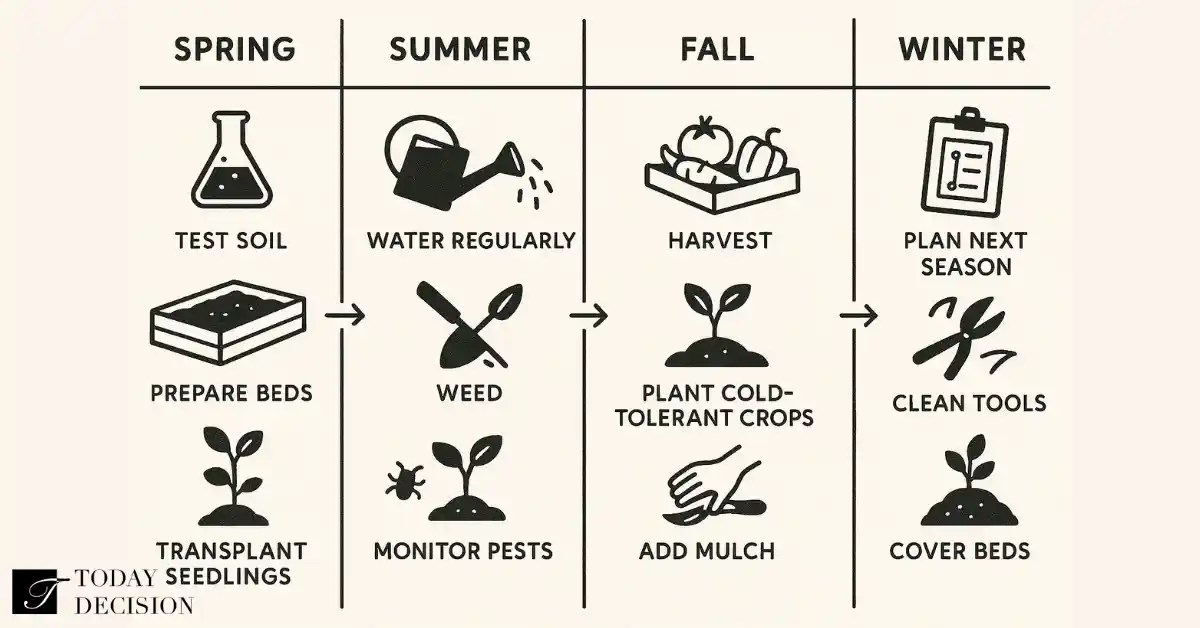
Spring:
- Start by clearing out any remaining debris from the previous year. Test and amend your soil if needed.
- Direct sow cool-season crops like peas, lettuce, carrots, and spinach once the soil is workable.
- Begin indoor seed starting for warm-season plants like tomatoes and peppers about 6–8 weeks before your area’s last frost date. Harden off seedlings before moving them outside.
Summer:
- This is the peak growing period. Stay consistent with watering, especially during dry spells.
- Mulch to conserve moisture and suppress weeds.
- Monitor for pests like squash bugs, aphids, and tomato hornworms.
- Prune as needed to encourage airflow and reduce disease risk.
- Harvest frequently to encourage more production and avoid waste.
Fall:
- Plant quick-growing fall crops like arugula, radishes, and kale.
- Pull spent plants and compost healthy material.
- Remove anything diseased and dispose of it separately.
- Add compost to beds and consider planting cover crops like clover or winter rye to rebuild the soil.
- If you plan to grow through winter, use cold frames or row covers.
Winter:
- This is the time for rest and planning. Clean and sharpen tools, organize seeds, and map out crop rotation for the next season.
- Review notes from the past year. If your soil is bare, cover it with mulch or cardboard to prevent erosion.
- Order seeds early—popular varieties often sell out before spring.
Troubleshooting Tips:
- Stunted growth? Check light exposure, spacing, and soil fertility.
- Yellowing leaves? It could be overwatering, poor drainage, or nutrient imbalance.
- Pest holes or chew marks? Look under leaves for insects; remove by hand or use mild organic treatments.
- Slow germination? Soil may be too cold or dry—wait and water consistently.
- Keeping a log helps identify patterns and makes it easier to adjust year to year.
Resources, Tools & Planning Templates
Basic Tools to Start With:
- Garden trowel and hand fork
- Pruners or scissors for trimming
- Sturdy gloves
- Watering can or hose with a gentle spray nozzle
- Rake for leveling soil and spreading mulch
- A spade or shovel for digging and turning soil
Optional but Useful Additions:
- Soil thermometer
- Row markers or plant labels
- Trellises or cages for climbing crops
- Compost bin or pile
- Drip irrigation kit for efficient watering
Planning Templates & Tracking:
Use a garden journal or digital app to track your plantings, germination dates, and harvests. Free printable charts are available through cooperative extension websites. These tools help you rotate crops properly, avoid over-planting, and remember which varieties performed best.
FAQ
What is the best month to start a vegetable garden?
Usually March or April, depending on your last frost date. Check your local zone to time planting correctly.
What is the easiest vegetable to grow in your backyard?
Lettuce, spinach, radishes, and bush beans grow fast, need little care, and are ideal for beginners in most climates.
What is the most common mistake of first-time gardeners?
Overplanting and crowding plants—this leads to poor airflow, pest issues, and lower yields. Start small and build gradually.
What vegetables should not be planted next to each other in a garden?
Avoid onions near beans, and tomatoes near corn. Also, don’t group plants from the same family in one spot.
Can I plant cucumbers and tomatoes together?
Yes, but space them out and use separate supports. They need similar care and can attract overlapping pests. Monitor closely.
This content is generated by AI, reviewed by our editorial team, and features products that have been thoroughly evaluated and chosen.